
Close


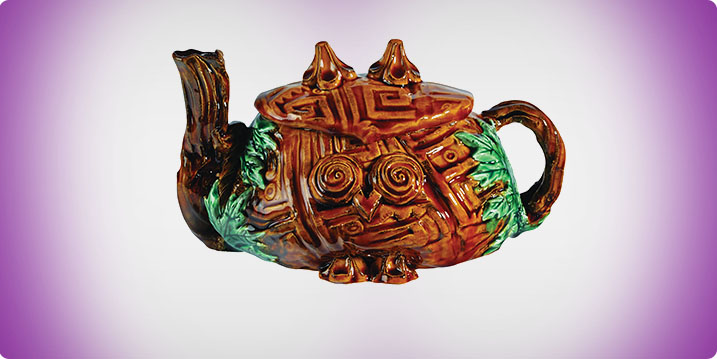
Owl Textured Teapots
Lesson Plan, Grades 8-12, Sax Lesson Plans, Art, Science, AMACO
Description
In this process students will use new and assorted molds and texture plates to form and create a finished ceramic piece. The students will combine the functional elements of a traditional teapot with the form of an owl (or other chosen figure).
Objectives
- Students will study structure and function of the traditional teapot form.
- Students will research and study the structure of the owl (or other chosen figure) and the variety of its shapes and forms.
- Students will relate and integrate the elements of both teapots and owls, to form a functional structure.
- Students will experiment with various textures, and layering of textures to achieve desired image results.
- Students will use semi translucent glazes to enhance textures.
Supplies Needed
Amaco® Handle Sprig Mold 1402972
Amaco® Leaf Sprig Mold 1402964
Amaco® Decorative Foot Sprig Mold 1442855
Amaco® Low Fire Earthenware White 25 Clay, Moist, 25 lbs. 411390
Amaco® LG Gloss Glaze, Amber, LG 65, Pint 351872
Amaco® LG Gloss Glaze, Emerald Green, LG 45, Pint 351833
Amaco® LG Gloss Glaze, Leaf Green, LG 46, Pint 351836
Amaco® LUG Liquid Underglaze, Light Brown, LUG 30, Pint 437618
Amaco® LUG Liquid Underglaze, Dark Green, LUG 43, Pint 437633
Amaco® Clay Roller Set, 4 Sleeves and 4 Handles 1402963
Hardwood Clay Roller, 18" Length, 10.5" Roller, Sold Individually 227478
Jack Richeson Pottery Tool Set, Assorted Size, Set of 8 385223
Standards
CONTENT Standard #1: Understanding and applying media, techniques and processes.
CONTENT Standard #2: Using knowledge of structures and functions.
Instructions
1
Post research, students will illustrate concept.
2
A paper pattern is recommended for the body of the teapot - to obtain a general size concept and to assist with slab preparation.
3
Roll clay slabs 3/8" thick using a slab roller or hardwood roller. Experiment with various texture molds on sample slabs to achieve desired results.
4
Roll a final slab body for finished piece, several inches larger than your paper template, and texture with selected tools.
5
Trim to paper template size, stand cut pieces upright and curve slab to form body of teapot. Be careful in handling the slab as not to disturb the pattern too much. Score and slip the ends together.
6
Roll slab for base (larger than anticipated) and secure to body using the score and slip method and trim to appropriate size.
7
Create teapot handle (to use Amaco handle mold, push clay down into mold and use a non-metal rib to remove excess. Use a small pinch of wet clay to push on it gently and pull it out). Use score and slip method to secure handle and temporarily support it (using newspaper) if necessary.
8
Create teapot spout by rolling slab to appropriate size and texture with selected texturing tool. Curve to form, score and slip to seal tubular form.
9
Before applying spout to body of teapot estimate application point and use a needle tool to make several holes for the water to drain through to the spout. Ensure that they are large enough that they will not be clogged by the flow of glaze in the firing or application process.
10
After score and slip spout application, roll slab for lid, texture as desired and cut to size. Newspaper can be used as a temporary armature in desired shape.
11
At this time, the sprig molds can be used to add special elements to the piece. These molds are used in the same process as the handle mold, and the delicate pieces can then be scored and slipped onto the pot in the desired areas.
12
Allow to dry completely and bisque fire as directed by clay and kiln manufacturers.
13
Glaze using Amaco LG series glazes using manufacturers application instructions. They will accent the textures of the piece. You can also use an underglaze in certain areas first, wipe away excess from the raised surfaces and apply LG glazes over those. This will further enhance the texture patterns.
14
Glaze fire as directed by glaze and kiln manufacturers.


