
Close


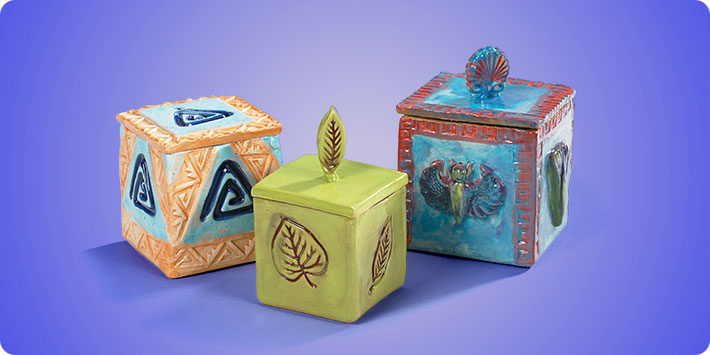
Textured Pottery Boxes
Lesson Plan, Grades 4-12, Sax Lesson Plans, Art, Social Studies, Mayco
Description
Since prehistoric times, people have adorned pottery with stamped textures, created by pressing something into the wet clay. For millennia, clay has been all about texture! Not only is clay the ideal medium for stamping, but it also lends itself to sprigging - the application of raised adornments. In Roman times, for example, clay was pressed into small molds, then removed and applied to pottery. This technique was refined during the Industrial Revolution in England, when Josiah Wedgwood sprigged neo-classical motifs on formal pottery. Using both stamping and sprigging techniques, your students can create their own textured pottery - in this case, a square box made by folding a plus-shaped slab of clay.
Objectives
- Students will stamp and sprig a square clay box with lid created using a plus-shaped template.
- Students will explore the history of stamping and sprigging techniques in pottery making.
Supplies Needed
SAX® Cream White Clay, 50 lbs. moist 200366
Mayco® Stroke 'n Coat Wonderglaze for Bisque 12-pint Color Set A 406464
12-pint Color Set B 406466
Mayco® Continuous Design Border Rollers 2-roller Decorative Pattern set 411101
2-roller Native American set 1289972
Mayco® Design Press Tools 4-tool Seaside set 1289968
4-tool Contemporary Flower set 1289970
4-tool Native American set 1289971
4-tool Spiral Design set 411096 4-tool Insect/Lizard set 411098
Sax® Creative Molding Kits 6-piece Original 404286
6-piece Abstract Round 409083
6-piece Nature 409082
Mayco® Magic Metallics Copper, 8-ounce bottle 406494
Green Patina, 8-ounce bottle 406482
Toggle Wire Clay Cutter 1005537
Clay Slabmaking Kit optional 409782
Rigid Scraper optional 241590
Fettling knife optional 385142
Craft Sticks, Pack of 1000 085957
Sax Double Ended Wire Tool Set, 6 in, Wood Handle, Set of 7 1440530
Standards
CONTENT Standard #1: Understanding and applying media, techniques and processes
CONTENT Standard #3: Choosing and evaluating a range of subject matter, symbols and ideas
CONTENT Standard #4: Understanding the visual arts in relation to history and cultures
Instructions
Teacher preparation:
Gather photographs of stamped pottery and formal Wedgwood pottery. Display these books and images and discuss their historical context with students.
1
Start with a baseball-sized lump of clay (about 1 pound) for a 2-inch cubic box, an orange-sized lump (about 1 ½ pounds) for a 2 ½-inch one and a grapefruit-sized lump of clay (about 2 pounds) for a 3-inch one.
2
Use a ruler to draw a plus sign-shaped template on tag board or poster board, making each side of the plus sign the same length as the desired box dimension (i.e., 2, 2 ½ or 3 inch). Cut out template.
3
Using a rolling pin and guide sticks, roll out clay on a canvas mat to a circle ¼ inch thick.
4
Hand-texture the slab. If desired, smooth away the weave imprint left by the canvas mat with a sponge and straightedge rib.
5
Place plus-sign template on the slab and cut carefully around it with a thin-blade fettling knife held vertically. Remove excess clay. Avoid using a pin tool, which will leave a ragged edge.
6
Turn the plus sign-shaped clay slab over. With a dental floss pick, bevel to a 45-degree angle the eight sides of the slab that form interior corners; these will become the box's corners. Leave the flat ends of the slab's four arms unbeveled, as these will become the box's rim.
7
Prepare the slab for folding. Use the long edge of a craft stick to score gently the square defined by the slab's four interior corners. This square will become the box bottom when the slab's four arms are folded upward.
8
Turn the slab over so that the outside of the box faces up. Stamp, sprig or add a border to the four arms of the slab as desired, leaving the center square - the box's bottom - free of embellishment.
9
To make sprigs:
- Press clay into a mold, gently scraping away excess clay with a straightedge, flat rib or ruler.
- Press a small piece of wet clay against the back of the sprig to lift it out of mold.
- Score and slip the spring before pressing it on to one of the arms of the plus sign.
- Gently turn the plus-shaped slab over, placing it atop foam or bubble wrap to protect sprigs from distortion. Score and slip the eight beveled surfaces and fold arms up to join them, forming a box and smoothing seams inside and out with fingers or a tool.
- Level the rim of the box as necessary with an X-ACTO® knife, fettling knife or wire.
10
To make the lid:
- Roll remaining clay into a ¼ inch-thick slab, invert box atop it, and cut around the rim.
- Texture the lid as desired to match the box.
- If desired, add a handle atop the lid and small lid stops beneath it to keep it on the box.
- Slowly dry the lid upside down atop the box to prevent warping.
- Brush two or three coats of Mayco® Stroke 'n Coat evenly on to bone-dry greenware. If you prefer, you may bisque the box and lid to cone 04 first.
- When dry, fire to cone.
- Do so slowly if you have applied glaze to bone-dry greenware.
11
For an unfired box, bisque to cone 04 and then decorate with acrylic paint, creating antique patinas with Mayco® Magic Metallic. Alternatively, decorate bisqueware with tempera paint and, when dry, coat with Sax® Tempera Varnish.


